Sam's is your source for Hatteras and Cabo Yacht parts.

Enter a part description OR part number to search the Hatteras/Cabo parts catalog:

Email Sam's or call 1-800-678-9230 to order parts.

Windshield Frame Leaks and Results - How is the frame anchored?

  • Thread starter Thread starter Vincentc
  • Start date Start date
  • Replies Replies 10
  • Views Views 10,136

Vincentc

Legendary Member
Joined
Jun 3, 2008
Messages
1,514
Status
  1. OWNER - I own a Hatteras Yacht
Hatteras Model
43' DOUBLE CABIN (1970 - 1984)
A moisture meter is a dangerous thing to play with. After finding an area of significant moisture in front of the windshield I felt compelled to do something, and had no plans to run the boat Sunday. There was a lot of moisture, no water just in front of the frame, apparently coming from the stbd and center frames. I opened up and cleaned out the wet areas and am now letting it dry.

IMGP9226r.jpg


IMGP9228r.jpg


IMGP9244r.jpg


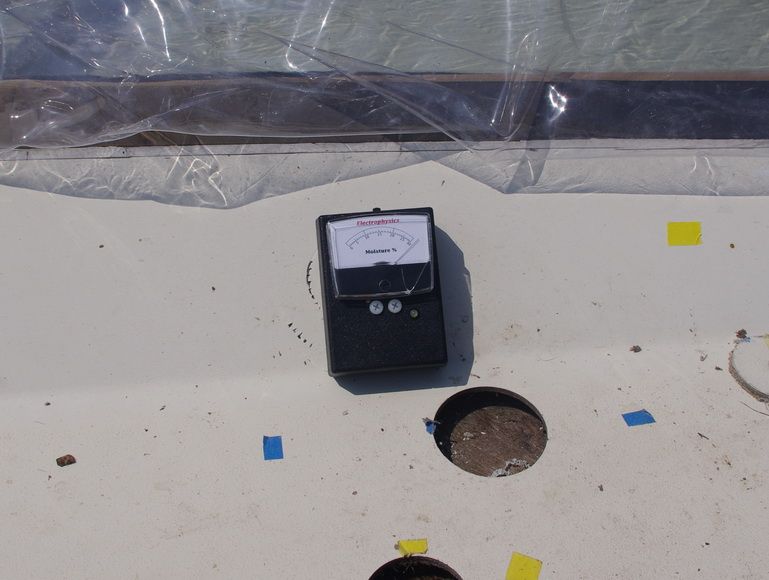
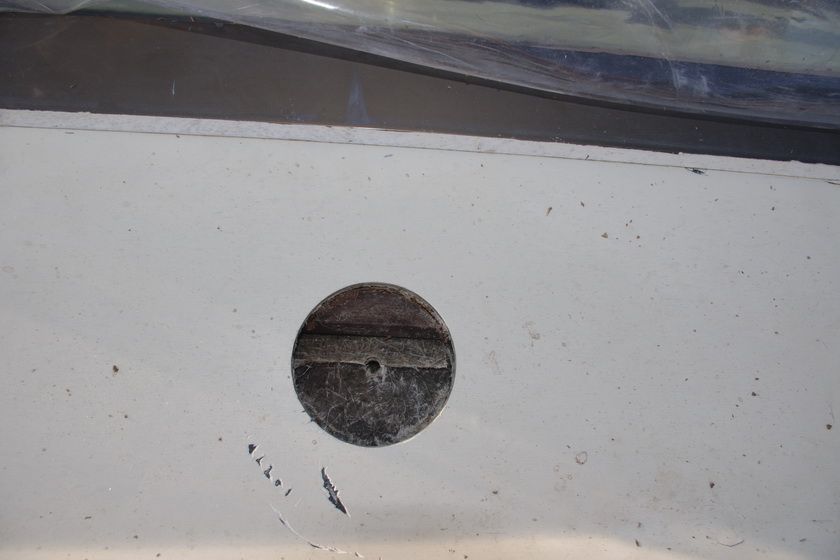
It was probably not helpful to drill into the slope just below the windshield, but the meter pegged there and curiousity got the better of me and there was indeed water there. I believe it would have drained out on its own once the wet core was removed. In case you want to to see what it looks like under the slope see above.

My Question:
I need to find the source of the leak coming from the windshield and figure out how to fix it.
I believe I know how to remove and re-bed the glass. I could also have a leak around the frame. It does not look like the frame is removable, I see there are screw heads along the bottom of the frame behind the glass pointing down into the fiberglass. Any idea what the screws are attached to. I want to bed the screw holes with epoxy but do not want to mess anything up. Can anyone tell me how the screws are attached?
Thanks
 
"Subscribed" - I'm right behind you on this project (glad you're going first!).
 
I have the same problem. I have removed the calking from between the aluminum frame and the fiberglass at the bottom of the windshield. It appears the screws just go into the fiberglass. The holes seem to be wollowed out. In my case, a proper repair would require removing the windshield frame, which I am not willing to do yet. I have forced calking all around the screw holes and the leak seems to be fixed, although I don't know if it will hold long. I will be watching to see how you fair. Good luck!
 
On my 1979 model 43DC - when I had the boat dis-assembled to transport it - we had to remove the flybridge and also the windows. The front frame on mine was held in-place with the screws that are along the bottom of the frame. They were screwed into a threaded stainless plate that was embedded in the fiberglass. The side frames have screws in the bottom and top of the frames that is hidden by the fuzz and channels. We removed the glass sliders in the side windows and the hinged center part of the front frame. The front and side frames came out in one piece. When this was re-assembled we used foam gasket tape and caulk - and so far - 8 years - no leaks that I'm aware of. Hope that this helps.
 
Do you have any detailed photos of the disassembly, particularly in the transport mode? Was there any sawing involved?
 
Greg - I have a few photos but nothing detailed. There was no sawing involved. We removed the screws in the bottom and top of the front windshields that are visible from the inside and removed the hinged window. After removing the sliding side windows we removed the screws in the side window frames from inside the tracks underneath the fuzz both top and bottom. We removed the screws that were in the tubular posts at the ends of the 'wing walls". We then used piano wire to cut out the caulking. The other screws/bolts were removed from the stainless steel tubular posts at 45 degree angle at the side windows and the rear support posts. Straps were used to lift off the roof/flybridge. The window frame came out in one piece - front and side windows with the fixed front glass left in-place. The window frame was placed inside the aft deck - and was supported and secured with ratchet straps. Re-assembly was pretty much the reverse. It took one day to dis-assemble and one day to re-assemble - which includes all the associated wiring, steering hydraulic lines and control cabling.
Send me an email at eze2bme@aol.com, tag it "Hatteras" in the subject line, and I'll send some photos. Needless to say, it was an interesting process.
Tom
 
Thanks for the information. I emailed Tom and hope to receive copies of the photos of his disassembled windshield.

Subject to learning more, my thoughts currently are:
Leaks around the window to frame connection and around the frame to deck connection could cause leaks into the deck core through the screw holes. I hope to address both possible leak sources, but would also like to re bed what looks like machine screws going from the frame into the deck. I am thinking about removing the screws, waxing the screw threads to prevent them being glued to the epoxy, injecting filled epoxy in the screw holes, sliding a piece of vis-queen between the frame and the fiberglass, to prevent gluing the frame to the fiberglass deck, and then screwing the machine screws back into the threaded plate in the fiberglass. When everything has set up I can then remove the screws, remove the visqueen and bed the screws with butyl tape.

Re Scott's comments about me leading the way. In reminds me of one of the things I learned during a 6 week stay at Ft. Bragg way back when Viet Nam was an issue. Being the point man was a job you should try to avoid.

Regards,
 
Our front windows were leaking a little to the inside of the frame (and I presume also into the deck core). We had good results with Captain Tolley's Creeping Crack Sealer. It is very thin viscosity and capillary action pulls it into cracks where it sets up/drys into a rubbery solid. A very little goes a long way. Took about 4 - 6 applications along the bottom outside of the window to build up enough so that it stopped dissapearing into the frame/seal. Has been a year and as best we can tell no leaks. Great for sealing screws too.

Worth a try if your windows are not leaking too much. It is harder to use on vertical surfaces, but can be done there also if you slowly use so little that it sucks in and does not run off.

Regards, Bob K
 
. I hope to address both possible leak sources, but would also like to re bed what looks like machine screws going from the frame into the deck. I am thinking about removing the screws, waxing the screw threads to prevent them being glued to the epoxy, injecting filled epoxy in the screw holes, sliding a piece of vis-queen between the frame and the fiberglass, to prevent gluing the frame to the fiberglass deck, and then screwing the machine screws back into the threaded plate in the fiberglass. When everything has set up I can then remove the screws, remove the visqueen and bed the screws with butyl tape.

Regards,

Vincent,

I've never taken a window apart, but seriously doubt Hatteras would have used machine screws to anchor windows into glass and deck core. Are they Robertson (square) heads? I think window sealing and replacement has been discussed here before and a search could give you some recommendations. Personally, I would fill with epoxy and drill to use self tapping screws.

Bobk
 
CAUTION: If you're going to cut-open the joint between the windshield frame and the fiberglass - don't forget that the wiring for the wipers goes up inside the frame. On my 1979, the vertical part of the frame to the right of the operable window unit contained the wiring - as seen from the inside looking forward.
 
Tom,
Thanks for the reminder regarding the wiper wiring.

Bob,
Based upon Tom's earlier advice that the screws go into a threaded ss plate I assume they are machine screws. The are flat head slotted and look like machine screws to me.

The weather was threatening and I covered things up for now.

Regards
 

Forum statistics

Threads
38,133
Messages
448,508
Members
12,481
Latest member
mrich1

Latest Posts

Trending content

Back
Top Bottom