MikeP
Legendary Member
- Joined
- Apr 12, 2005
- Messages
- 8,674
- Status
- OTHER
- Hatteras Model
- Not Currently A Hatteras Owner
As this project is now nearly complete, here are some suggestions that may help others planning to use Amtico. I figured out some of these rather late in the game and they are not in any order of importance. Some of them were mentioned in earlier posts.
1. The Amtico two part adhesive will become unusable in about 45 minutes after being mixed. I was able to mix partial amounts by draining all the hardener into a separate container that can be resealed. If you don't seal it, the hardener will harden on it's own in 2 days. You can mix appropriate amounts of the two-part as you need it. I mixed 1/4 of the mix at a time. Drain the hardner into a measuring cup and pour 1/4 of it into the appropriate amount of resin. I just guessed the resin by eye - no precise measuring and it worked fine.
2. You must dry lay the flooring first. You cannot possibly lay 2-part adhesive and then cut/place. You have to cut, dry lay, pick up the flooring and keep it organized, lay the adhesive, and put the flooring back down.
3. There will be a lot of individual pieces if you random cut. For example, there were 160 separate pieces between the port side door and the starboard edge of the helm console (the section to which the wheel is attached ). One of the most difficult problems is keeping the pieces in order when you pick them up to put the adhesive down. This was a real nightmare until a light bulb went on and I figured out that the way to deal with this is to lay a few strips of masking tape across the pieces. This will allow you to pull up (and lay back down) large sections at a time. This was a HUGE time saver that I didn't think of until about 2/3 through the project.
4. You will need lots of denatured alcohol to clean up the adhesive that will get all over everything. When the adhesive dries, it cannot be removed except mechanically. Clean, clean, and re-clean the surface with a rag wet with alcohol. Use plenty of alcohol (and ventilation.) You will have to lay flooring, clean with alcohol, wait 10-15 minutes and ensure the flooring is pressed firmly down...
5. Do this either with a roller or by placing a piece of plywood on the floor and walking on it. After you do this, there will be adhesive squeezed up and some misalignment of the pieces. Realign as necessary and clean with an alcohol-soaked rag. Don't rub too hard - it will just move the pieces. Wait 20-30 minutes and do it again. When you think the floor is fairly well set and the adhesive is getting firm, do it again. Immediately check all the seams to be sure there are no unsightly gaps. Re align if needed. This will be your last chance! Be sure to get all the adhesive off the surface!!!
6. Any end of either the teak or holly that will go under molding or whatever can be cut with snips rather than bothering with a chop saw. This will save considerable time. The same is true for edge pieces that will be under molding
7. Use a chop saw with a veneer/plywood blade to cut the random lengths. If you are a masochist, you can also do this with a razor knife and a square. I tried a paper cutter as someone suggested but the one I tried couldn't cut through the Amtico. Perhaps a really heavy-duty one could. But a chop saw will be faster anyway.
8. Do not consider using single-part adhesive. I found out this weekend that a boat owner in our marina laid Amtico last year and decided not to bother with the 2-part. Contrary to the factory recommendation, he used single part adhesive. The floor is now buckling in places just as Amtico says it will if single part is used on floors with extreme temperature variations (like a boat dealing with 10 degree temps in the winter and 90+ temps in the summer.)
9. If your old flooring used asphalt adhesive, like the galley in our 53, after you scrape it up, go over the entire floor with rags soaked in paint thinner to ensure no traces of adhesive remain. If the old adhesive remains on the surface, the new flooring will not be bonded to the subfloor, it will be bonded to the greasy asphalt. If, after you clean the asphalt on the galley subfloor, it is still sticky to walk on, re-clean with paint thinner. Once the floor is no longer sticky, it is ready for the new flooring. NOTE that the floor will remain black from the old adhesive; as long as it's not sticky, the new adhesive will bond to the wood.
10. A block plane with a SHARP blade works beautifully at trimming overlapped amtico on stairs or hatches. It is much cleaner, quieter, and more precise than using a router or saw.
11. Forget about trying to be neat. You will get adhesive all over everything. Don't worry about it. Get everything in place in the section you are working and then clean up the adhesive. Denatured alcohol cleans it easily and it will not affect any other finish on the boat unless, for some reason, shellac was used. ( A beautiful finish material, by the way, but totally inappropriate for use around moisture). BE SURE to clean the adhesive trowel every 30-40 minutes with alcohol or the v-grooves will no longer be grooves! (the trowel will come with the Amtico adhesive)
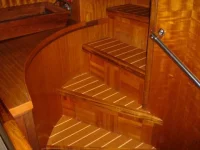
This is a lot of work to do right (random-cut) but it is beautiful. It seems like everyone in the marina wants to see it now after a local yacht broker looked at it last week, and told everyone, "I can't tell that it isn't wood." It's really not an exageration - it looks like wood. But boy, is it a lot of work! Frankly, real teak and holly planks wouldn't be any more work (but would cost a lot more and require tons more maintenance. I still have to do the heads and I have a bit of trim work to do on the hatches and asome stair molding but all the serious work is done.
Carpeting is scheduled to go in next week. Boat will be cruising LI Sound for the week of June 13, new countertops/sinks go in the following week.
1. The Amtico two part adhesive will become unusable in about 45 minutes after being mixed. I was able to mix partial amounts by draining all the hardener into a separate container that can be resealed. If you don't seal it, the hardener will harden on it's own in 2 days. You can mix appropriate amounts of the two-part as you need it. I mixed 1/4 of the mix at a time. Drain the hardner into a measuring cup and pour 1/4 of it into the appropriate amount of resin. I just guessed the resin by eye - no precise measuring and it worked fine.
2. You must dry lay the flooring first. You cannot possibly lay 2-part adhesive and then cut/place. You have to cut, dry lay, pick up the flooring and keep it organized, lay the adhesive, and put the flooring back down.
3. There will be a lot of individual pieces if you random cut. For example, there were 160 separate pieces between the port side door and the starboard edge of the helm console (the section to which the wheel is attached ). One of the most difficult problems is keeping the pieces in order when you pick them up to put the adhesive down. This was a real nightmare until a light bulb went on and I figured out that the way to deal with this is to lay a few strips of masking tape across the pieces. This will allow you to pull up (and lay back down) large sections at a time. This was a HUGE time saver that I didn't think of until about 2/3 through the project.
4. You will need lots of denatured alcohol to clean up the adhesive that will get all over everything. When the adhesive dries, it cannot be removed except mechanically. Clean, clean, and re-clean the surface with a rag wet with alcohol. Use plenty of alcohol (and ventilation.) You will have to lay flooring, clean with alcohol, wait 10-15 minutes and ensure the flooring is pressed firmly down...
5. Do this either with a roller or by placing a piece of plywood on the floor and walking on it. After you do this, there will be adhesive squeezed up and some misalignment of the pieces. Realign as necessary and clean with an alcohol-soaked rag. Don't rub too hard - it will just move the pieces. Wait 20-30 minutes and do it again. When you think the floor is fairly well set and the adhesive is getting firm, do it again. Immediately check all the seams to be sure there are no unsightly gaps. Re align if needed. This will be your last chance! Be sure to get all the adhesive off the surface!!!
6. Any end of either the teak or holly that will go under molding or whatever can be cut with snips rather than bothering with a chop saw. This will save considerable time. The same is true for edge pieces that will be under molding
7. Use a chop saw with a veneer/plywood blade to cut the random lengths. If you are a masochist, you can also do this with a razor knife and a square. I tried a paper cutter as someone suggested but the one I tried couldn't cut through the Amtico. Perhaps a really heavy-duty one could. But a chop saw will be faster anyway.
8. Do not consider using single-part adhesive. I found out this weekend that a boat owner in our marina laid Amtico last year and decided not to bother with the 2-part. Contrary to the factory recommendation, he used single part adhesive. The floor is now buckling in places just as Amtico says it will if single part is used on floors with extreme temperature variations (like a boat dealing with 10 degree temps in the winter and 90+ temps in the summer.)
9. If your old flooring used asphalt adhesive, like the galley in our 53, after you scrape it up, go over the entire floor with rags soaked in paint thinner to ensure no traces of adhesive remain. If the old adhesive remains on the surface, the new flooring will not be bonded to the subfloor, it will be bonded to the greasy asphalt. If, after you clean the asphalt on the galley subfloor, it is still sticky to walk on, re-clean with paint thinner. Once the floor is no longer sticky, it is ready for the new flooring. NOTE that the floor will remain black from the old adhesive; as long as it's not sticky, the new adhesive will bond to the wood.
10. A block plane with a SHARP blade works beautifully at trimming overlapped amtico on stairs or hatches. It is much cleaner, quieter, and more precise than using a router or saw.
11. Forget about trying to be neat. You will get adhesive all over everything. Don't worry about it. Get everything in place in the section you are working and then clean up the adhesive. Denatured alcohol cleans it easily and it will not affect any other finish on the boat unless, for some reason, shellac was used. ( A beautiful finish material, by the way, but totally inappropriate for use around moisture). BE SURE to clean the adhesive trowel every 30-40 minutes with alcohol or the v-grooves will no longer be grooves! (the trowel will come with the Amtico adhesive)
This is a lot of work to do right (random-cut) but it is beautiful. It seems like everyone in the marina wants to see it now after a local yacht broker looked at it last week, and told everyone, "I can't tell that it isn't wood." It's really not an exageration - it looks like wood. But boy, is it a lot of work! Frankly, real teak and holly planks wouldn't be any more work (but would cost a lot more and require tons more maintenance. I still have to do the heads and I have a bit of trim work to do on the hatches and asome stair molding but all the serious work is done.
Carpeting is scheduled to go in next week. Boat will be cruising LI Sound for the week of June 13, new countertops/sinks go in the following week.


")
") seriously, teh carpet edge is a little tricky when you carry things down to the galley.
seriously, teh carpet edge is a little tricky when you carry things down to the galley.