Sam's is your source for Hatteras and Cabo Yacht parts.

Enter a part description OR part number to search the Hatteras/Cabo parts catalog:

Email Sam's or call 1-800-678-9230 to order parts.

Plexiglass Side Windows

  • Thread starter Thread starter madhatter66
  • Start date Start date
  • Replies Replies 17
  • Views Views 5,929

madhatter66

Active member
Joined
Sep 12, 2013
Messages
85
Status
  1. OWNER - I own a Hatteras Yacht
Hatteras Model
34' CONVERTIBLE (1965 - 1969)
I'm looking into replacing the side windows on my 34C. The tinted plexiglass with be secured using the 3M 5962 VHB with a caulking of Dow 795. The plexi will be either 3/8 or 1/2in. Will replacing the glass windows with plexi cause a structural issue for the flybridge? The front windshields have already been removed and replaced with plywood and 2 layers of fiberglass. I was hoping to use a 1 piece but due to limited mainly lack of availability I think I have to go with 2 pieces and joint togehter. Plan for using 2 pieces will have me placing an added support in the middle of the window opening. Plywood attached to the topside and fiberglass over. The window opening is an estimated 32" height 9.5ft length. This will est break down each piece to 35" height 5ft length. Thx
 
My suggestion is to install 2 support posts instead of one breaking the opening into thirds.
Are you adding a window frame to set the glass into (frameless install) or trying to install the panels on the face (outside) of the house?
Wouldn't use plexi as it will scratch too easily and also expand and contract more than glass. We made patterns and had tinted tempered glass panels made to install into our frameless frames we added.
The tempered prosses can take a while but the cost was far less than what I would have thought, we actually had an extra set made just in case.
 
Don’t use plexiglass. It will craz crack in a short time. Easy to scratch. Safety glass only.
 
Since I was considering using the VHB, the plan was outside of the house. I read that's some strong foam adhesive. No need for screws for a cleaner look.
 
This is an example. 2 sheets joined together and support behind the gap. Suggestion on thickness. Could be done the same but in 3 sections as stated above. I figured 2 sheets will have a better look. The other reason I'm considering this way is I never open the original Windows anyway. Bonus better seal.
 

Attachments

  • Action memo20180316_125057_1.webp
    Action memo20180316_125057_1.webp
    46.4 KB · Views: 301
We've used some of the super strong 2 way tapes for projects that have worked well, but just don't think 2 way tape is a good way to go., You would have to remove the paint and primer to get down to at least the gelcoat and or glass to make sure you're sticking to something structural.
The plexi is going to really come and go with the heat cold cycles much more than the cabin sides which will take a toll over time.
Also just cant see being able to hold a good edge with the caulk line on the edge of the plexi. What's the tape going to look like thru the plexi on the outside, and the UV could damage the tape.

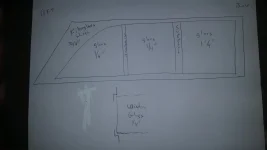
We used fiberglass sheets with a ledge epoxied to the back side for the glass to sit in, the hole piece was epoxied to the cabin side. The forward angle piece is a separate piece of fiberglass sheet that is epoxied on and painted black
Very crude drawing of what we did.
CricketWindowDetail.webp
 
Thx

Ill look into doing a 3 section install to cut down on each size of the plexi panel.
 
My suggestion is to install 2 support posts instead of one breaking the opening into thirds.
Are you adding a window frame to set the glass into (frameless install) or trying to install the panels on the face (outside) of the house?
Wouldn't use plexi as it will scratch too easily and also expand and contract more than glass. We made patterns and had tinted tempered glass panels made to install into our frameless frames we added.
The tempered prosses can take a while but the cost was far less than what I would have thought, we actually had an extra set made just in case.
I am curious about using plexiglass as well. There is no way you can ever clean it without scratching in an outdoor environment.

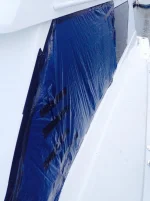
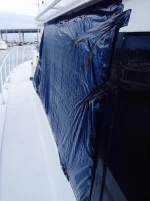
IMG_5964.webpIMG_5966.webp

Cricket is correct on the tempered. I lost my forward salon window in 2015. After struggling to find someone who'd take it on, it took about 4 weeks to have the glass made up and installed. The whole thing installed was $650; the window from the extreme front point was between 8 and 10' long. I just knew they would break it carrying it unsupported, but they were the glass guys so all went well.

Plexiglass is a short term solution.
 
I love the blue tint. better than the solex green in my opinion.


Id look at a single joint in the glass. A 34 is pretty short. Theres no need to put in support just expansion joints.
 
I love the blue tint. better than the solex green in my opinion.


Id look at a single joint in the glass. A 34 is pretty short. Theres no need to put in support just expansion joints.
Well that was before I put the heat gun on it.
 
Well I began the install of the plexi. It's attached to the frame using 3M 5962 VHB. Each side was covered using 2 pieces. There's 1/4" gap between the each half. On the inside I placed a 4" width behind the gap. Later the other edges will be filled with Dow 795.
 

Attachments

  • FB_IMG_1525957188609.webp
    FB_IMG_1525957188609.webp
    70.2 KB · Views: 124
Starboard side
 

Attachments

  • FB_IMG_1525957202413.webp
    FB_IMG_1525957202413.webp
    85.9 KB · Views: 125
Port side
 

Attachments

  • FB_IMG_1525957208524.webp
    FB_IMG_1525957208524.webp
    86.7 KB · Views: 123
Interior
 

Attachments

  • FB_IMG_1525957214223.webp
    FB_IMG_1525957214223.webp
    89.9 KB · Views: 127
Completion of the side windows. She's back on the hard for her winter hibernation.
 

Attachments

  • Screenshot_20180707-034539.webp
    Screenshot_20180707-034539.webp
    19.7 KB · Views: 93
We've used some of the super strong 2 way tapes for projects that have worked well, but just don't think 2 way tape is a good way to go., You would have to remove the paint and primer to get down to at least the gelcoat and or glass to make sure you're sticking to something structural.
The plexi is going to really come and go with the heat cold cycles much more than the cabin sides which will take a toll over time.
Also just cant see being able to hold a good edge with the caulk line on the edge of the plexi. What's the tape going to look like thru the plexi on the outside, and the UV could damage the tape.

We used fiberglass sheets with a ledge epoxied to the back side for the glass to sit in, the hole piece was epoxied to the cabin side. The forward angle piece is a separate piece of fiberglass sheet that is epoxied on and painted black
Very crude drawing of what we did.
View attachment 24825

How high did you make the flange for the glass to glue to ,did you run it all the way around the window ? Thanks Ray
 
The outer aluminum frame was left in place. The frame was sanded, alcohol wiped and 3M primer applied. The plexiglass extended 1/4" over the outer most frame. Inner side of the plexiglass was painted to hide the VHB tape. 3M VHB double side tape was used to attach the plexiglass to frame. Dow 795 sealant to finish it off.
 
I did mine just to get rid of the old aluminium frames because the paint is just going to peel on aluminium and they will leak again at some point. It is easy to add the fiberglass frame for anyone else thinking about it here is my link of the process.
https://www.samsmarine.com/forums/showthread.php?27345-My-Winter-project
Also one piece tempered glass and I do not understand why extra supports were added they are not needed in a 34C it is rock solid?
 

Forum statistics

Threads
38,133
Messages
448,509
Members
12,481
Latest member
mrich1

Latest Posts

Trending content

Back
Top Bottom