Sam's is your source for Hatteras and Cabo Yacht parts.

Enter a part description OR part number to search the Hatteras/Cabo parts catalog:

Email Sam's or call 1-800-678-9230 to order parts.

Water Heater Removal. How to do it??

scottinsydney

Well-known member
Joined
Jul 23, 2014
Messages
897
Status
  1. OWNER - I own a Hatteras Yacht
Hatteras Model
61' MOTOR YACHT (1980 - 1985)
After 36 years the old water heater has started leaking from the inside. A new slimline water heater is on it's way.

But how do I get the old water heater dismantled as it will not fit though the engine room doors. Electric Saw? Chain crusher? Does the drain at the bottom front unscrew? Tips / ideas greatly appreciated.
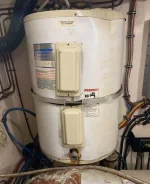
old water heater.webp
 
Last edited:
I removed the door trim and it fit
 
I had to remove the door trim on both sides and cut off the outer skin then I had to also cut back the foam from the tank exterior and it fit thru with a good shove. I replaced it with a Bradford white unit from Lowe’s.
 
Scott , I was able to peel the outside metal off the insulation which in my case was foam, and then chunk up th foam with a chisel enough so it fit out the door, wasn’t that hard, no trim removal required. New slimmer unit just squeezed back in. John
 
Remove the trim . You still might have to remove some outer skin .
 
I removed mine thru the overhead hatch.
 
For mine I only had to remove one side of the door trim to get it out.
 
Hate to sound like I'm bragging but I'm glad PO just installed a new one on Pau Hana to sell her.
 
Hate to sound like I'm bragging but I'm glad PO just installed a new one on Pau Hana to sell her.

It wasn't a bad job at all. I think it was actually one of the easier jobs I've done on this boat.
 
Is the door trim simply screwed in? Or am I going to be cutting wood?
 
Is the door trim simply screwed in? Or am I going to be cutting wood?

I pulled the door stop. It was nailed in with small brass finish nails and caulked. I used a small putty knife to pry it loose. It seems like a trim piece on the inside had to come off first. Take your time and you can dissect it.
 
I've studied the door trim and used a putty knife to test, but my door frame seems glued in. Any trim removal would be destructive. Not going that way.

Hoses and AC disconnected today. Drained tank.

So I will try the Bosch electric saw while water heater is still in its wall cradle cutting top to bottom. Angle grinder might put out too many sparks, but an option for outer casing.

Seems I need to reduce the diameter by 4".

I have fit 20 year old coming on Friday to help and also swap 12 batteries. Best $100 ever spent.
 
When I removed my tank the top and bottom were removed then I used a pair of good tin snips and cut the shell in two,top to bottom. The hard part was pulling the shell from the foam insulation but the use of an electric knife came in handy to also cut the foam from tank without too much of a mess. When handling the razor sharp tin shell the use of leather work gloves is highly recommended.
 
grinder or a saw is going to make a mess and the cuttings will rust if you dont get them all cleaned out.. i would try to disassemble it first then tin snips as mentioned above
 
Thanks. On my way to the hardware store for the tin snips and gloves. Also going to buy a heavy mallet to see if it can be bashed in somewhat.

In six years of ownership, this is the least expected/worst problem I have faced and a real nuisance this time of year.
 
Last edited:
Thanks. On my way to the hardware store for the tin snips and gloves. Also going to buy a heavy mallet to see if it can be bashed in somewhat. In six years of ownership, this is the least expected/worst problem I have faced and a real nuisance this time of year.
I’ve been living in fear for the last six years.
 
This is simply a terrible soul destroying job. Robert, you are right to live in fear.

Day two saw half of the outer casing peeled back. The water heater was seated top and bottom in a thick aluminium bracket that was installed before the engine was put in. I had to cut the bracket to allow the heater to move. The heater had swelled over the years and was wedged tight.

Tomorrow I will have some hired muscle to help lift the heater off the bracket and move/replace 12 batteries. We will place the heater on top of the engine and we can then pull the base off and curl up the edges at the top. Also need to peel back another foot of the outer casing and remove the insulation for it to go through the door.

It almost looks like we are winning.


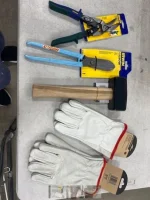
Thank you for suggesting the tools:

heater1.webp

Tin snips on left are the better tool for this job. Gloves were invaluable.


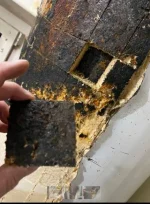
Heater2.webp

The tank had been leaking. Photo showing peeled back outer casing and foam insulation. Elements and thermostat had seen better days. I guess there was no visible water seepage as the engine room and heater was always hot.

heater3.webp

I used a sabre saw to cut the insulation in to Space Shuttle Tiles. This made foam removal straight forward and easy. Recommended procedure.
 
Last edited:
I didn't do this in time, but I always include a shop vac when tackling jobs such as this. Some of our boats appear to have been built around a water heater which was suspended in space and the rest of the boat built around it.
 
After 36 years the old water heater has started leaking from the inside. A new slimline water heater is on it's way.

But how do I get the old water heater dismantled as it will not fit though the engine room doors. Electric Saw? Chain crusher? Does the drain at the bottom front unscrew? 0

I replaced my water heater last year. It was essentially the same width as the door, maybe 1/64 to spare, but it did just fit through.
 
Last edited:

Forum statistics

Threads
38,129
Messages
448,458
Members
12,481
Latest member
mrich1

Latest Posts

Trending content

Back
Top Bottom