Sam's is your source for Hatteras and Cabo Yacht parts.

Enter a part description OR part number to search the Hatteras/Cabo parts catalog:

Email Sam's or call 1-800-678-9230 to order parts.

Removing Intercoolers 12v71

scottinsydney

Well-known member
Joined
Jul 23, 2014
Messages
899
Status
  1. OWNER - I own a Hatteras Yacht
Hatteras Model
61' MOTOR YACHT (1980 - 1985)
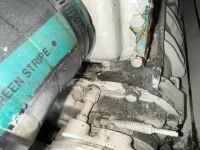
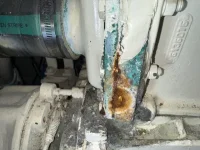
Both engines twin intercooler's have vergegris on the gasket ends and also sinister powdery aluminium now resting on the blower below. It seems the rear intercoolers are worse than the front. Its now time to service them. I'll do one engine this year and one next year.

We are going to remove the starboard engine/s intercoolers. I have watched a video https://youtu.be/EKJ9bqQtW5A?si=35jRGk1mRWXNJvAZ

Does anyone have any other helpful hints. I am thinking that along with new gaskets/seals that the faces of each intercooler will need to be machined. New bolts. Hopefully we will not find any other damage or leaking blower seals.

Would anyone have an intercooler parts diagram please?

Comments please. Work is due to start in about 10 days.

Scott.
 
Last edited:
Please define vergegris.
Some pictures would be great.
I have been into a few DDC intercoolers and I'm here to tell all, You can do more damage than good, cracking the ends off.
AND THEN, discovering there was nothing wrong under the end covers.
 
Dictionary
Definitions from Oxford Languages · Learn more
ver·di·gris
/ˈvərdəˌɡrēs,ˈvərdəˌɡrē/
noun
a bright bluish-green encrustation or patina formed on copper or brass by atmospheric oxidation, consisting of basic copper carbonate.
 
Below is another video that is pretty good. Just did my 8-V71's. I had trouble with mine leaking through the P hole on the saltwater side. The advice I can give is to make sure to remove the piece between the tank and exhaust outlet flange. It needs to be cleaned really good where the o rings go and that is hard to do on the boat. Also the faces of the flanges where the o rings mate need to be spotless clean. I had trouble with them leaking using grease or vaseline on the o rings as some of the mechanics stated to use. Someone told me an old shrimp boat mechanic told them to always coat the o rings with permatex silicone seal and let cure when working on the saltwater side. I cleaned the grease of and I did this and that took care of my leaks.

https://www.donvandiesel.com/
 
Dictionary
Definitions from Oxford Languages · Learn more
ver·di·gris
/ˈvərdəˌɡrēs,ˈvərdəˌɡrē/
noun
a bright bluish-green encrustation or patina formed on copper or brass by atmospheric oxidation, consisting of basic copper carbonate.

patina

So some green stuff on the outside. Worth opening Pandora's box in cleaning it up?
 
Here are a couple of photos of the major issue. I last looked at it closely 4 weeks ago and cleaned / vacuumed.

You can see from today's photos the new grey aluminium oxide powder sitting on the top of the blower. This has come off the side / ends of the rear intercooler.

It is not easy to find a Detroit mechanic in Australia.

As an immediate step I am thinking of getting the dremel / wire wheel into the corroding spots and going back to bare aluminium if possible. The applying an aluminium etch to seal the outside.

Opinions? And again requesting any tricks in removing the intercoolers?

int2.webp


int1.webp
 
Last edited:
Opinions? And again requesting any tricks in removing the intercoolers?
For now, I would try to tighten that one bolt and nut only just a bit. Maybe slow that weep down just a tad, maybe not but try.
Wash all well with bilge cleaner, dry, prime, paint.

Don't touch that corner bolt threaded into the case. It will probably break.

If your really going for it, consider my path;

IMO removing the vertical long studs does make life so much easier.
Start from the rear, Removing that plumbing from the front is a PIA.
Remove the hose from the raw pump connect, loosen the fuel cooler (if installed here) hose clamps, inter-intercooler hose clamps and forward end hose clamps.
With the flapper removed start sending some penatrate down the long studs. Using the nuts that held down the flapper, jam a couple on the long stud top and start working the stud loose.
All studs out, just slide the intercooler aft in your hands and move forward.

You will break some end bolts in the intercooler.
Be prepared to drill & tap AND drill & heli-coil.
Purchase all new bolts, nuts and washers.

The first time I serviced mine and re-installed them, they leaked water everywhere.
Back off, I tested them in a flooded cooler with plumbers expanding test plugs.
I ended up making my own gaskets and no more problems.

Do you have an old fashioned radiator shop near by to pressure test your new gaskets?

Don't forget new hoses and new (better) clamps.
 
Last edited:
Capt Ralph,

The gaskets have arrived and we will be starting the intercooler removal and refurbishment job the next couple of weeks.

I do like the idea of removing the log studs first.

Should we first twist in one or two studs when remounting the intercoolers?
 
The air gasket mating surfaces must be smooth with no gouges or old gasket material.
I have a big asp flat file I use length wise to ensure this.
Vacuum everything out of the blower. Clean well the threaded holes for the mounting studs.
TefGel on the stud ends that screw into the blowers. Remember you have two different lengths of these studs.
Use double nuts to screw in the studs completely down, not vice grips. If there is vice grip gouges on the studs, file them down.
Keep in mind that there are 4 or 5 different types of metals involved with these coolers. No scratches, TefGel, grease and patience will help reduce issues and make future service nicer.

The challenge is that lil hose between the coolers.
Lowering both coolers at the same time, with that hose in place is not going to happen.

Grease up the air gaskets well and lay on the blowers. A couple of studs for the rear cooler laid in place first. Grease up the hose nipples. With a fresh hose in place (with loose fresh clamps) on the rear cooler, hand guide the forward cooler toward the aft cooler so the hose connects together with out the cooler touching the blower.

Now with the weight of the back of the forward cooler supported buy the hose, one of your hands still holding up the forward end of the cooler, grab a long stud and send it thru and down a hole that you can watch. Eyeball the stud to the blower and lower the cooler down on the blower.

If I was to do this project now, I would probably still smash my fingers, offer blood sacrifices, offer some entertaining language.
It never goes as planned but this may be close enough to keep your mind intact.:D
 
The best thing you could do is pressure test both intercoolers .
 
Here we go....

Yesterday my 18 yo great nephew and I started to remove the top caps off the intercoolers.

All went well until the thread on a stud on the forward intercooler was found binded into to the cap and was not budging despite much physical persuasion and verbal abuse.

Today, with the agreement of our mechanic Dave watching by WattsApp video from North Carolina we used a sawzill to carefully cut the stud and immediately lifted the cap off. No metal filings were found in the intercooler and vacuum was running. So good job. Lucky.

Tomorrow's job will be to remove all the studs with our newly acquired Stillson plumbers wrench with the exception of the cut off stud you can see in the photo.

We will also cut through the small connecting hose and lift off the intercoolers individually. They are both rocking on the studs... so they are loose.

There are oil deposits in the intercooler fins and its all a little dirty. Turbos nice and dry. Probably 25 years since intercoolers were last serviced.

Does anyone know the DD white paint colour code or colour name? Maybe I can get a couple of rattle cans made up. I'd also like to take the opportunity to clean things up and improve looks.


inter1.webp

inter2.webp
 
Last edited:
Use an A/C plastic coil comb if any of the intercooler fins are bent. No metal touches those alloy fins.
Oil and dirt are normal.
Turned upside down, soaking in a strong solution of Simple-Green overnight and rinsing backwards is how I clean them when removed.
Yours actually look great already.
Have fun and keep us up ☺
 
Well Capt Ralph was right... these intercoolers are fighting the whole way.

The plumbers Stillson pipe wrench worked a treat on all but one stud on the rear intercooler. (The same stud as got stuck on the front intercooler. ) This is where the gasket water leak is. I only used the same force on that stud as I did the others. Looks like there was corrosion half way down the stud and it snapped... not twisted. Its also possible that the end thread is locked by corrosion into the blower

It is not possible to lift the intercooler off the stud. There is no purchase for the crow bar or other tools. We also used a liberal amount of heat with no success.

Other than the recalcitrant studs, the intercoolers are ready to come off and now rock nicely on the blower. At this stage I would say I am delayed but not dismayed.

My DD mechanic / colleague Dave in North Carolina via WattsAp video followed the progress. I did soak the studs in PB Blaster eqivalent.

I am going to look for a mini jack to see if will fit. There is no real structure to take any force. Other than that it may be the sawzill again and some repairing of wounds with JB Weld. This is not my favoured method, but there is penty of meat. The thread stud end in the blower will need to be "outed" or drilled out and helicoil inserted. Looks like a trip to the machine shop.

Other thoughts are that I will increase the stud hole size to avoid this entire issue into the future. The stud hole size tollerances are too fine for this type of remedial maintenance.

For those wondering why all this bother, the end of the rear intercooler was leaking and I do not not want salt water damage to the motor.

Anyway I will be an expert when the port engine undergoes the same treatment.
 
Last edited:
Armed with my new cordless sawzill and 12" metal blade the coolers were wedged up. The gaskets were about the same thickness as the blade. It took about two seconds to cut through each stud. Simple, easy and no damage to the castings.

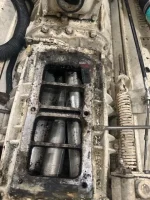
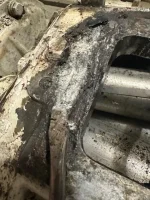
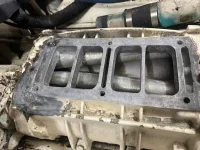
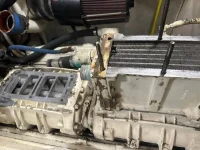
Lifting off both intercoolers revealed a dirty mess but no corrosion in the danger spots.

Indeed the rear blower's blades were pristine and the front were clean. The shop vac got rid of the dirt and then several cleaning rags with bilge cleaner and carby cleaner were used to clean the blower and engine up. I was able to get the vac's thin suction end between the blower blower blades. I am confident nothing fell into the blower

You will also see in the second photo a rear casting channels filled up with crud (aluminium oxide?). The rear channel is the one that can deteriorate and leak water into the blower and is what was causing concern in the first place. The middle channel in the first photo is clear of debris and you can see the outline of the front channel full of crud.

There was no oil collected in the front intrcooler, however oil ooozed out of the rear intercooler. I underdstand this is blowby.

I've decided to let a machine shop pull apart the intercoolers for me. Too much huffing and puffing.

My next task will be to try and remove the two cut studs from the blower and clean out the channels.


inter1.webp

inter2.webp


inter5.webp
 
Last edited:
I took the intercoolers to a machine shop to remove all the bolts and take a look at the 12 studs of which 2 had been cut. A further two studs were rusted toast and will require replacement. There was so much corrosion on the studs its no wonder the two rear left were immovable.

Removing the cut off studs from the blower went as expected. Heat did not work, Easyout tool did not work, swearing did not work.

So I carefully tapped centre and drilled them out with increasing sized drill bits.

The rear intercooler stud peeled out and we have about half the thread left.

I was not so lucky with the front intercooler and have a nice hole to fill with JB Weld and tap. I decided to stop drilling while I was ahead.

So I am about where I expected to be and am still pleased to have taken this remedial action.
 
Helicoils are my friend. Used a bunch in rebuilding my inter-coolers. Don't forget a bunch of Tef-Gel when assembling them back together with fresh machine screws.
 
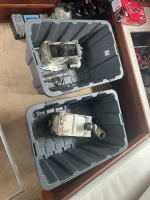
The project has been proceeding with the intercoolers cleaned and new gaskets replaced by a machine shop. Most bolts broke and were replaced.

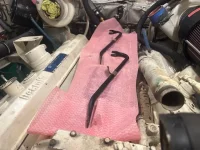
The aluminium surfaces were cleaned and etch primed. Two heliccoils were used. Two studs were ordered from USA. The forward intercooler went on easily with the studs easily aligning. The rear intercooler had to be reseated when studs did not screw in. Pressure tested. Now perfect.

Tef-Geled the stud ends.


int1.webp

Off to the metal shop for servicing.

int2.webp

Etched aluminium ready for reassembly. Note helicoil top left stud hole.

int3.webp
First intercooler on.
 
Last edited:
I like clean and shiny. Tough job but satisfying when you get it all completed.
 

Forum statistics

Threads
38,144
Messages
448,580
Members
12,481
Latest member
mrich1

Latest Posts

Trending content

Back
Top Bottom